TODO
UPDATE FOR PIMICS 13.0 - NEW CATEGORY FEATURES:
Bulk Edit for Categories (New in 13.0):
- Bulk edit functionality is now available for Item Groups, Product Groups, Chapters, and Catalog Groups
- Users can now edit multiple categories at once (previously only available for items)
- Add section explaining how to access and use bulk edit for categories
- Include screenshots showing the bulk edit action on category list pages
- Document which fields can be bulk edited for each category type
- Provide use cases (e.g., updating system status, changing parent categories in bulk)
PIM History for Categories (New in 13.0):
- Historical tracking is now available for all category types (Item Groups, Product Groups, Chapters, Catalog Groups)
- Users can view complete change history for categories
- Add section on accessing PIM History for categories
- Document what data is tracked (descriptions, features, custom fields, etc.)
- Include screenshots of the history viewer for categories
- Explain how this enhances traceability and compliance
- Note any prerequisites or configuration requirements
- Link to existing PIM History documentation for items
Action required:
- Add "Bulk Editing Categories" subsection
- Add "Viewing Category History" subsection
- Update screenshots to show new actions on category cards
- Create workflow examples for common bulk edit scenarios
- Document differences between item history and category history (if any)
Define the categories
Typically, the first step in every project after completing the PIM module configuration is to define the categories or structure for your items. In Pimics, there are several types of categories, from the lower levels nearest to items to the higher, more generic levels. The standard Pimics categories are, in order:
Item Group (our customers also call it Product, Item Master, or Item Family), Product Group, Chapter, Catalog Group.

The recommendation is to define the structure in such a way that an Item is assigned to an Item Group, the Item Group to a Product Group, the Product Group to a Chapter, the Chapter to a Catalog Group, and higher levels are created just from Catalog Groups. A product structure created with hierarchy in mind comes with advantages like inheritance, but it is possible to make any other kind of structure and skip any of these levels.
Define the structure
We suggest starting from the bottom and working upward. You should identify similar items and put them into an Item Group. The reason is that not every item is unique, so you can cover similar items by defining common data on the Item Group level, and Pimics then inherits that data, such as features and texts, into items. A typical example of an Item Group would be a product with multiple variations that differ by color or size, such as a T-shirt in the garment industry.
Do the same for item groups into product groups, product groups into chapters, etc.
Note
The following steps describe the most straightforward process for creating a simple structure, but there are more efficient options if your structure is complex. See Define structure.
- Using Alt+Q, search for Items and open the relevant link, or access Product Information > Items. Open an item card.
- Under the Pimics – General FastTab, define the Standard Item Group field.
- Choose from the existing item groups in the dropdown, or create a new Item Group by using the New button. When you create a new Item Group, you must fill in the Code and Description fields.

- In the same way, you can create the structure for all categories. The Item Group card contains the Standard Product Group field, the Product Group card contains the Standard Chapter field, and so on.
- Using Alt+Q, search for Item Groups and open the relevant link, or access Product Information > Item Groups. Open an Item Group card.
- Go to the Pimics – General FastTab and define the Standard Product Group for the current Item Group. This works the same way as on the item card.
Repeat this process to work your way through the structure until you have defined the standard parent category for each level.
Note
Typically, the chapter is the last category level where the standard category field must be defined (Standard Catalog Group in this case). However, in certain circumstances you might need to extend your structure and define Standard Catalog Group also for other catalog groups – this is possible too.
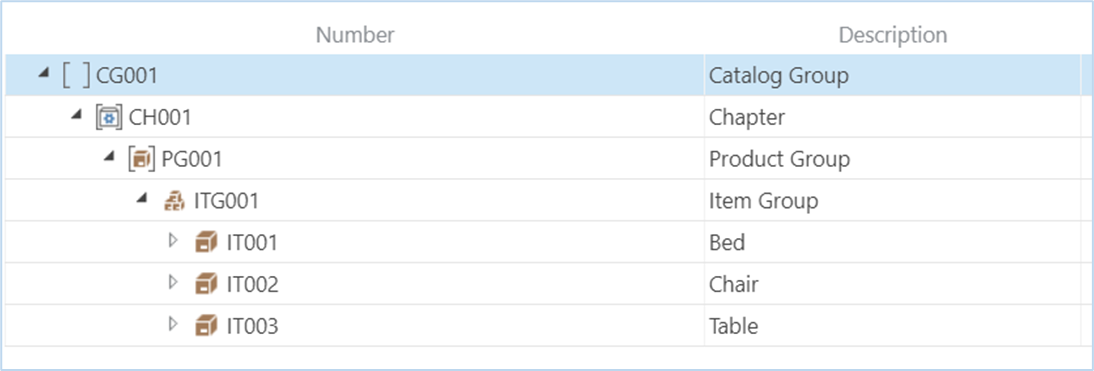
Visual representation of the product tree
Previously, we learned how to structure the categories in Pimics. Now let’s see a visual representation of the created structure and modify it.
- In the main navigation menu, go to Product Information > Allocation Tree.
- In the action bar, select Insert New Peer > Catalog Group. This opens a page with all existing Catalog Groups.
- Select the Catalog Group that you created in the previous section and click OK to confirm.
- Select the line with your Catalog Group and go to Actions > Line > Expand All. The structure expands to the lowest level, and you can see an overview of all child branches down to individual items.
- You can also alter the structure, and therefore the product hierarchy, by dragging and dropping the category lines.
Item Group lifecycle
- Search for Item Groups and select the related link.
- Select New
- Assign to Standard Product Group
- Complete the item group data as needed.
- To assign an Item Group to channels, select Assign to Channels.
- On the list of channels, select one or more lines where the item group will be available.
- After closing the page, you can see the new values in the Channel field.
- Create or link existing items to the Item Group by selecting items in the Linking section that should be part of this Item Group.
- Alternatively, on Items, select this Item Group as the Standard Item Group.
- To verify that you have not forgotten anything, select Certify. This checks the data against the assigned checklists.
- You should see a new value in the System Status field.
- If it is Certified, you can continue.
- If it shows another value, such as Process or Partially Certified, review the details in the Certification Log and Channels FactBoxes.
- After everything is ready, synchronize the Item Group with publications by selecting Reorganize Publications.
- On the list of publications, select one or more lines where the item group will be updated immediately.