Features for Items & Categories
A feature is a basic technical attribute of an item or category, can be of various types and it can have a predefined set of values. Pimics can work with standard classification systems like ETIM, eCl@ss, GS1 and others that will be imported to the system. In our experience, however, most companies using Pimics will need to define at least a few features of their own for the products they sell.
Product Features
Users can define the feature directly on items or categories. Anyway, we suggest to create definition of a feature before you use it.
Create features on item groups
- Using Alt+Q, search for item groups and open the relevant link, or access Product Information > Item Groups. Open an item group card
- Go to the FastTab Features
- In the action bar, select Manage > New Line
- Fill in the Description (e.g., Color) and Value (Green). After the field is left, a new record is created if there is no other feature with the same description
All items that have this item group set as Standard Item Group will inherit features defined at the standard item group level (see Categories). Also, inheritance of features must be allowed – for more details read about inheritance.

Repeat the previous two steps to define all required features related to the current item group
Create features on items
Items assigned to a specific item group will automatically inherit features from the item group if feature inheritance is enabled for those items. However, if you want to define specific features for items irrespective of their item group you can do it for each item just as you did previously for the item group. To define features for multiple items at once irrespective of their item group, you can select those items in the item list, and then access Features just as you would do for a single item.
Create features for multiple items belonging to the same item group
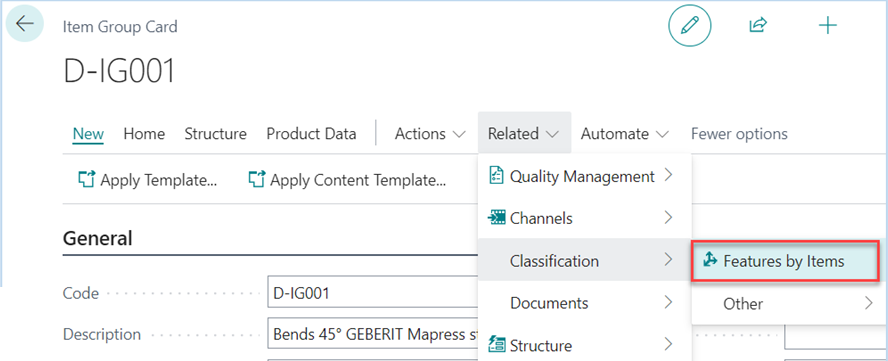
- On the item group card select the action Features by Items (action bar > More options > Related > Classification > Features by Items)

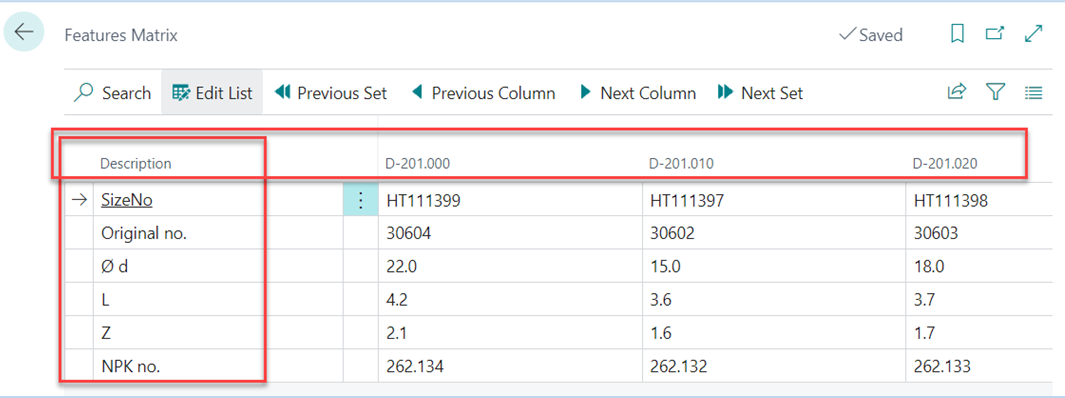
- Then a new page is shown, where you can see the matrix - items in the columns and features on the lines. That is, provided there are several items attached to that item group
- Fill up the values (from our example, Red, Green, etc.) into the cells for specific combinations of items and features

Close the page. You can now check individual item cards to see the specified features
Titles
Features can be organized into sections to improve customer experience in the channels.
Create Title line
Use Case, incl. Move up/down and indentation
Feature Groups
Feature Groups are lines that consist of more features. Feature Groups have the same list of features on every item or category, this is different again Title because titles can be different. A typical scenario for a Feature Group is Size which consists of features like Width, Height, and Depth. Before you can use Feature Group you need to define it.
Create Feature Group line
Use Case
Feature Value Set
Pimics use a Feature Value Set to define different allowed values on different items or categories but for the same feature. Typical use is for colors, different products can be paid by different colors, but the color sets are different per product group/type. In this case you create Feature Value Set for each Product Type.
Create Feature Value Set
Before you start creating a Feature Value Set you need to define all values on the feature. See how to define values on feature. The steps below shows how to define it on items, the similar steps can be used also for categories.
- Using Alt+Q, search for PIM Items and open the relevant link.
- Select an item where you'd like to define other set and select action Features
- Select a line with a feature that has defined values (See how to define values on feature)
- Under the group Values select action Create Value Set
- The new set has been created and the field Value Set gets a new value
- Select See Values and change the field Value Allowed
- Close page Product Features
- Select another item that will use the same values and select action Features
- Set field Value Set to the same value as it was in 4.1
- Now both items use the same values
Add new value into Feature Set
The value needs to be created in Feature Values first and then defined in all feature sets.
- Using Alt+Q, search for Features and open the relevant link.
- Select an Feature where you'd like to change values and open the card page
- In group Feature Values create a new line. More details in Define Values
- The value has been created in all sets.
- If the value is allowed or disabled by default is defined by the configuration in Catalog Setup field New Feature Value in Sets
- Select action Value Set Matrix it shows all value sets
- You can define if the new value is allowed or disabled for each sets
If you have more than 20 sets it is better to open Value Sets and select lines where you'd like to change the value and run Value Set Matrix in this case it will be filtered for the selected lines.
Item Attributes
Features are replacing the standard Item Attributes, so we don't suggest to use them together. Anyway there is way how to synchronize them if it is necessary for other extensions. It is desgined the way that Features in Pimics is the master entity where you manage it and it is synchronize back to Item Attributes. Because you can have already data in Item Attributes there is a process to copy those attributes into features after installation of Pimics.
Synchronise Features to Item Attributes
You can enable in general or select features that you'd like to synchronize. The synchronization is done when you change, create or delete feature in Pimics.
- Using Alt+Q, search for Catalog Setup and open the relevant link.
- Define a configuration in field Sync. To Attributes in the group Allocations.
When you change the field it doesn't have impact to the current data.
- Yes means that all features will be synchronise to attributes by default
- No means that no features will be synchronise to attributes by default
- Close the page
- Using Alt+Q, search for Features and open the relevant link.
- Select one of the features and open the card
- Define the beheviour for the selected feature in Sync. To Attributes in the group Details.
- Default use the settings from Catalog Setup
- Yes means that the feature is synchronised to attributes when it is changed on items
- No means taht the feature stays only in Pimics
- Close the page
Important notice Synchronization to Item Attributes of Polyvalent Features is not allowed. An error will be thrown when
Synchronization is turned on in configuration (page "Catalog Setup") and Polyvalent Features with "Sync. To Attributes" set to "Default" exits.
Synchronization is turned on for a Polyvalent Feature, the Feature has
2.1. "Sync. to Attributes" = "Default" and global configuration (page "Catalog Setup") of "Sync. to Attributes" is already turned on.
2.2. "Sync. to Attributes" = "Yes", regardless of global configuration
The Feature's Polyvalent is enabled, field "Sync. to Attributes"
3.1. is already set to "Yes"
3.2. is already set to "Default" and global configuration has "Sync. to Attributes" enabled
After the configuration you can follow usual process.
Be careful about the configuration of Feature. When Pimics synchronize it to Attributes, any change of the feature needs to be manually change also on the attribute. Translations are not synchronize at all.
Overtake Attributes to features. Shall we write it here or on another page like do after installation?
