Setting up Azure CDN for Pimics
There are two big components to setting up CDN for Pimics: one is the Business Central side (Pimics), the other one is the Azure side.
Here we only address the Business Central/Pimics side, as the Azure side of configuring CDN is extensively documented by Microsoft.
The application hasn't been listed in Azure Marketplace. Please write us if you want to use it in your Azure
It is currently available under the public preview, so it is ready ot use. The configuration can be quite hard to define and procedures can be changed without any notification.
Steps
- Setting up SharePoint integration
- Put CDN parameters in Document Setup
- Create Sharepoint Client
- Update public links on digital assets
Put CDN parameters in Document Setup
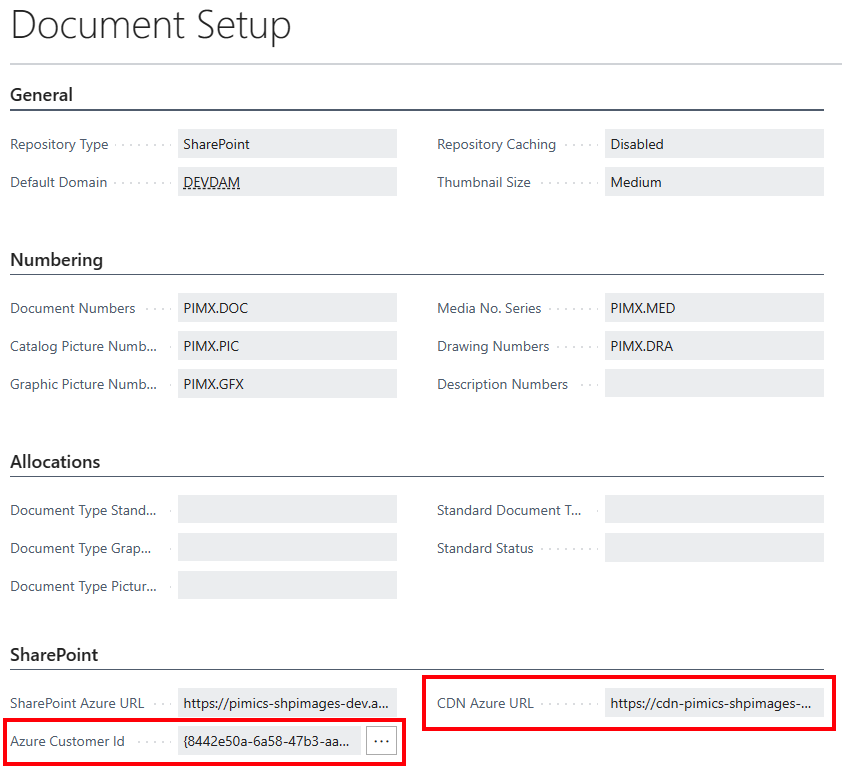
In Pimics, the primary setting for the Azure CDN domain/URL resides in the Document Setup page, together with the Sharepoint domain setup. There are two fields for this, and they are highlighted in the picture below.

The CDN Azure URL can be taken from Azure once the CDN service is configured there.
As for the Azure Customer ID, it is a GUID unique to Pimics that identifies the CDN environment for a particular company. When clicking on the three dots at the right side of the field, a new Azure Customer ID will be generated. If more companies need to share the same Sharepoint/CDN environment, they will need to have the same Azure Customer ID set up in their respective Pimics instances.
Create Sharepoint Client
This will create the necessary authentication parameters, stored in Azure not the local BC, so that CDN will be able to access your Pimics Sharepoint library.
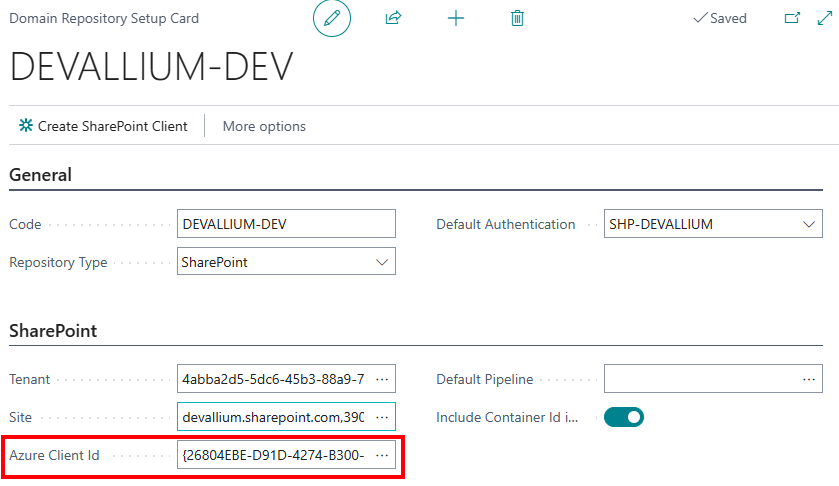
Using Alt+Q access Domain Repository Setup. Select your current Sharepoint domain, then click on Create Sharepoint Client as highlighted below:

If you will search for Sharepoint Azure Clients with Alt+Q, you will now be able to see your newly created Azure credentials for Sharepoint:

Back to the Domain Repository Setup, you will need to access your domain repository setup card, and set your newly created Azure Client ID in the relevant field highlighted below:

Update public links on digital assets
After setting up CDN, all that is left to do is to update the public links to the desired digital assets, to reflect the new access policy. You will need to first select these digital assets (pictures, documents, etc.), and then run the function Refresh Metadata. See more details in Refresh public links
