Installation and setup
Pimics works as an extension for Microsoft Dynamics Business Central or Dynamics NAV. There are several possible scenarios for installing Pimics. But the two single most important criteria to be determined are:
- Where does Business Central run? Is it on-premise, is it hosted in Azure, or is it Software as a Service hosted by Microsoft?
- What is the Business Central version?
Availability
Pimics is available for either cloud or on-premise installations of Business Central. You can use different versions of Business Central on your servers. Please keep in mind that we support only the latest 3 versions of Business Central, so we have the same maintenance period policy as Microsoft. That means each new major version of Pimics will get a downgrade to the previous 2 versions. Older versions are NOT getting the new functionality and there we only fix critical issues.
Packages
| Name | AppSource | Description | License Granule (on-premise license) |
|---|---|---|---|
| Allium Core | Not available standalone in AppSource | Contains shared code and functions across all Allium's extensions. There is no visible function to users | |
| Pimics PIM | Link | This extension covers most PIM functionality. It is used for managing product data and its publishing to channels | Pimics 365 |
| Pimics on-premise | Not listed in AppSource | Contains functionality for working with files stored in internal servers | Allium catalog - MDM |
| Pimics - Vendor Catalog | Link | This extension contains functionality for importing and managing data from vendors | Allium Catalog - Purchase Catalogue |
| BMECat for Pimics | Link | This extension contains functionality for importing and exporting BMECat files | Allium Catalog - Integration |
| DataNorm for Pimics | Link | This extension contains functionality for importing and exporting DataNorm files | Allium Catalog - Integration |
The complete overview is here Pimics in AppSource
Business Central runs as SaaS
This is the easiest way. Go to AppSource and find the Pimics extension. Or you can start from Business Central, access Extension Marketplace and search for Pimics. Either way, you just need to follow the installation wizard to get Pimics installed.
Assisted setup
The easiest way to start with Pimics after install is to use the Assisted Setup. This will help you set up the default configuration and migrate any needed data already existing in your standard BC.
- Using Alt+Q, search for assisted setup and open the relevant link
- From the list select Set Up Pimics in the Pimics category
- After reading the initial information, select Next to move to the next page
- On the language page define your main language in the field Default Language Code. You can also define as many secondary languages as you need for your catalogue here, clicking on the Pimics FastTab. Select Next to move to the next page
- The initial option for the digital assets repository is Database. If you are just evaluating Pimics or doing some tests that do not involve a significant amount of file-type data, this option is fine. If setting up a production instance of Pimics, please set up a proper repository for your digital asset files. Our first recommended option is Sharepoint. See more here: Sharepoint setup
- In Sales & Marketing Channels you can create the channels where you’d like to offer your products. They can be for example WEB, PRINT, etc., and also region or industry specific. Select Next to move to the next page
- In Pimics Users you will specify which users will work with Pimics, and you should also assign licenses to them. For more details about Pimics licensing, please see the Users setup section. Select Next to move to the next page
- Here you can select which data from existing items in Business Central will be overtaken to Pimics. Usually it is safe to select all fields. Press Next to move to the next page
It can happen that Pimics cannot overtake all existing item data because something is missing in the current configuration. In case you get an error message about this, please run the setup again and do not select overtaking the data.
- Select Finish to create records and prepare your Pimics instance
Business Central runs on-premise
First of all, you need to Download the relevant packages:
- Packages for on-premise (Latest Business Central)
- Packages for on-premise (other versions)
- You can find the packages by accessing the relevant subfolder based on your version of Business Central.
If you cannot access the repository, please ask your partner or account manager to give you access, or you can also write to info@pimics.com.
New customers
Before you can install Pimics we need to extend your license. For this, we need to contact the Microsoft partner company that manages your BC license.
Install Pimics on-premise
Pimics on-premise contains also additional libraries that need to be installed before the extension. Please follow the process:
Pimics contains only system libraries, so in many cases you don't need to copy the add-in folder. But in the case that you see an error that an package is missing please follow steps below
- Go to Release > Add-ins
- Download all DLL files from the folder
- Go to folder C:\Program Files\Microsoft Dynamics NAV\\Service\Add-Ins\ and create there an Allium folder
- Move all DLL files to the Allium folder
- Repeat steps 3 - 4 for all BC servers
- Restart all Business Central services
- Install the extension
Dependencies
For on-premise installations, packages need to be installed in the following order
- Allium Core
- Pimics PIM
- Pimics on-premise (if needed) See Install Pimics on-premise
- Pimics - Vendor Catalog (if needed)
- DataNorm for Pimics (if needed)
- BMECat for Pimics (if needed)
- Pimics PIM
Powershell scripts for installation
The Pimics user role
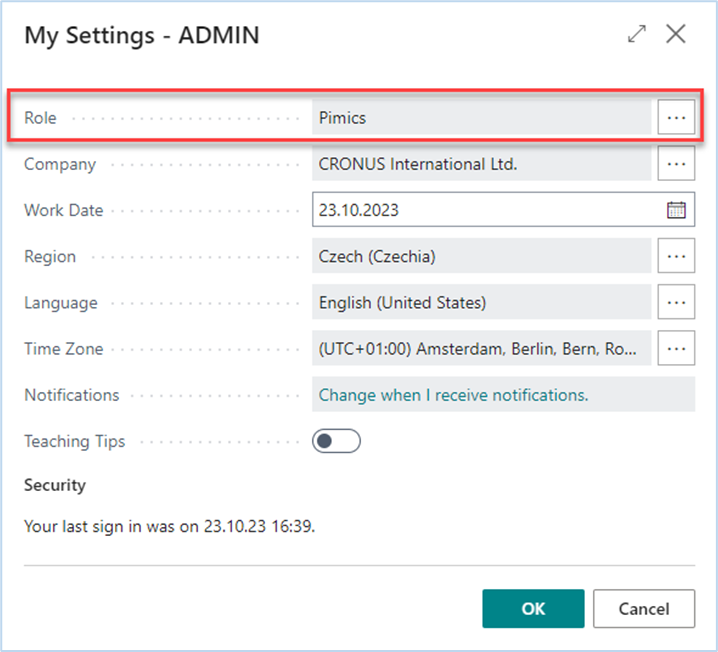
After installing and setting up Pimics, you need to configure access for product managers, or any other users who will manage product information. To do this, you must assign them the Pimics role in Business Central: in Settings > My Settings modify the role to Pimics.

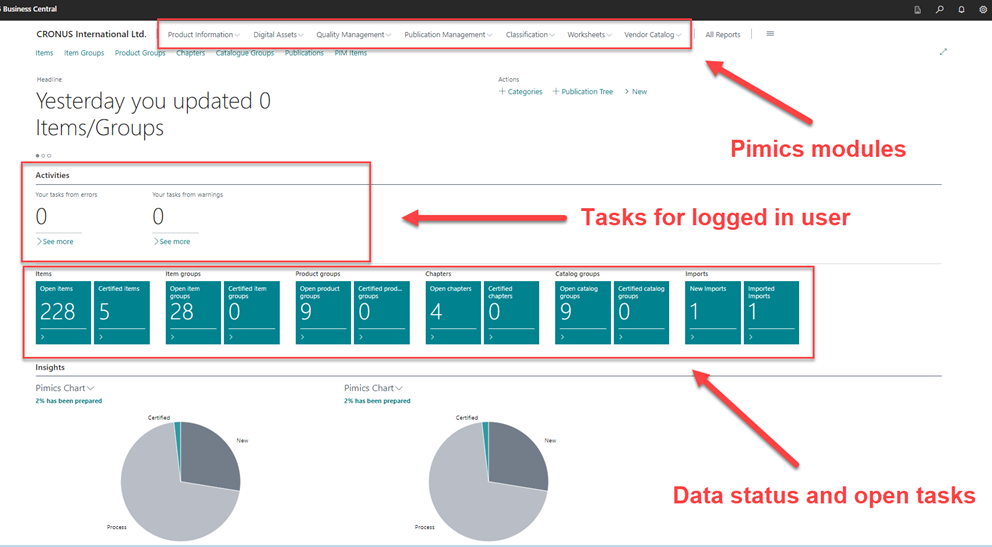
After logging in again, the user is presented with a home page related to Pimics functionalities and statistics:

Here you have everything you need to take advantage of the Pimics functionality. Enjoy!
