SharePoint as Digital Asset Management for Pimics
How to set up a Pimics-SharePoint integration
When using SharePoint as a file repository, every time you upload a digital asset to Pimics the document will be stored in SharePoint's library and a preview of the document will be created in Pimics.
Each document type can have its own separate library (Pictures, Documents, Graphics, Media). All libraries have to be on the same SharePoint site.
Steps
- Create a SharePoint site if you don't already have one
- Create an application in Azure Active Directory to get access to SharePoint
- Configure Pimics to work with SharePoint
- Do the initial synchronization of files from SharePoint to Pimics
Create a SharePoint site
Our suggestion is to create separate document libraries for Documents, Pictures, Graphics, CAD Drawings and Media, but you can also use one library for several document types. Please refer to Microsoft's documentation for details on site creation.
Create an application in Azure Active Directory
- Create a new application
- You can follow the steps in Microsoft's online documentation: Register a new application using the Azure portal
- Keep Redirect URI empty
- Set permissions for the application
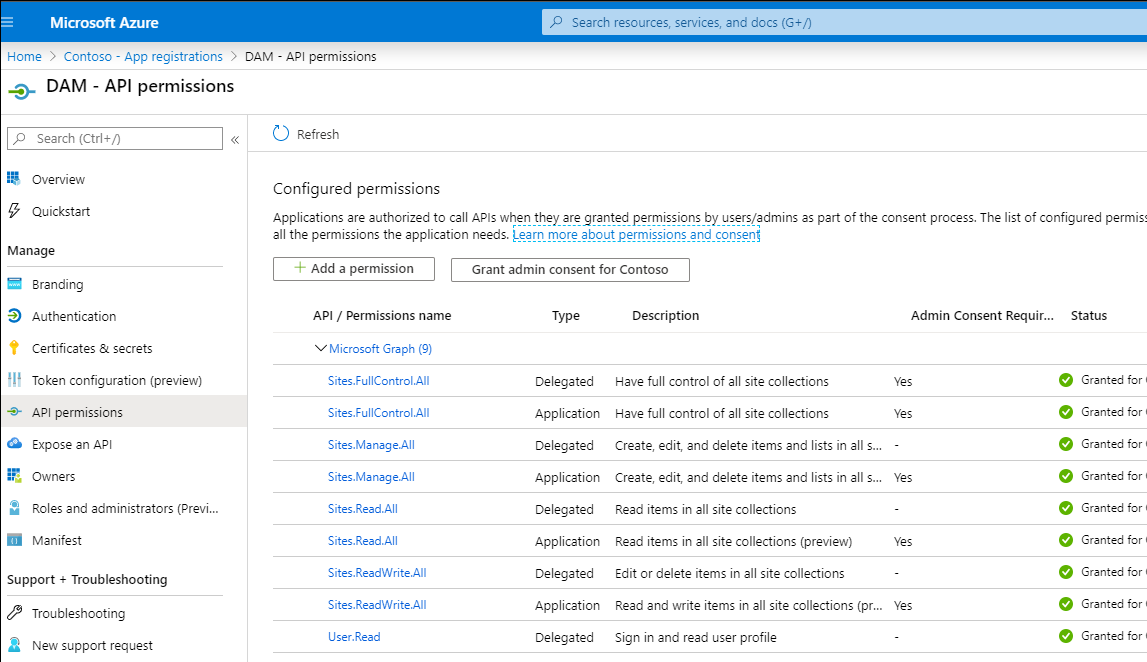
- Since we are using Graph, access needs to be granted for the Microsoft Graph API;
- Admin rights must be set for the company, via the Grant admin consent for
button; - Permissions should be the same as in the picture below:
- Generate a new secret for the application
- Open https://portal.azure.com/, search for Microsoft Entra ID (formerly Azure Active Directory), open the related link, in the left menu select Manage → App registration and your application from point 1 (or you can go through Add → App registration).
- In the app details, go to Certificates & secrets
- In the Client secrets group, select action New client secret
- On the new page, select fitting duration in Expires (Microsoft no longer supports unlimited duration)
- Select OK to create the secret
- On the certificates page you can see the client secret in Value. Copy it and store it somewhere together with the client ID, as you won't be able to recover it later from the Azure Active Directory
- When the secret expires, you'll have to create a new one and change the connection values in Pimics
Set the connection in Pimics
Add a new Authentication
- Using Alt+Q, search for Pimics Authentications and access it
- Press New to add an Authentication entry
- Select SharePoint on-line as Type
- Enter a preferred Code
- In group Service specify:
- ClientId - client identification from Azure Active Directory - Application (client) ID on the Azure app overview
- ClientSecret - client secret from Azure Active Directory, saved earlier
- Tenant - if you use Business Central SaaS it is the tenant ID, this can also be a valid PageURL or Domain - Directory (tenant) ID on the Azure app overview
The fields Login Url, Resource and Scope will be filled in automatically 4. If you want to use this Authentication as a default then activate the Default checkbox
Add a new SharePoint Domain
- Using Alt+Q, search for Domain Repository Setup and access it
- Press New to add a Domain Repository Setup entry
- Enter a preferred Code
- Select SharePoint as Repository Type
- Select the Pimics authentication created earlier as the Default Authentication
- Set the Tenant - if you use Business Central SaaS it is the tenant ID, this can also be a valid PageURL or Domain
- Use lookup in Site to select a site from SharePoint. The lookup will provide a list of available sites on your SharePoint and can be used to test the connection
Add the SharePoint domain to Document Setup and set up libraries for different document types
- Using Alt+Q, search for Document Setup and access it
- Select SharePoint in Repository Type
- Select the Default Domain created earlier - this will fill in the following values with the values from the selected domain
- In group Repository Location use lookup to select individual libraries for each document type, like in the example below:

- Select OK to close the page and finish the setup
Initial synchronization of files from SharePoint to Pimics
Pimics provides a report that can be run once, or in the background as a Job Queue entry. This report checks the SharePoint library and creates objects in Pimics based on the file data it finds.
Run the synchronization
- Using Alt+Q, search for Pimics SharePoint File Synchronization and access it
- Specify the folowing fields
- Import Action
- Create New will create only new files. The existing records in Pimics will be skipped.
- Update Existing will touch only existing records in Pimics and update them by the data in Sharepoint
- Both will create new files and update existing records in Pimics
- SharePoint Drive Id - select the library you want to synchronise
- Include Subfolders - if a library contains folders, here you can tell the report that you'd like to import files from folders. Otherwise only files from root will be imported
- Get Thumbnails - keep it to Yes. You can disable it to improve performance for big libraries
- Request Size - keep the default value. This can impact the performance
- Select OK to start the synchronization
- If you want to run this periodically, you can define it as a Job Queue entry. If synchronization is done just once, you don't need to do the following steps
- Choose the Search icon, enter Job Queue Entries and then choose the related link
- Define a new job queue by following Microsoft documentation
- Set Object Type to Run to Report and Object Id to Run to 70113723
- Define your Reccurence
- In Report Parameters set Report Request Pages to Yes and follow instructions from point 2
- When finished, select Set Status to Ready
- If you need to synchronise more libraries just follow steps 4 - 8 for each library